[TUTORIAL] HOW TO BUILD A SMS CHAT BOT
I recently built an SMS chat bot from scratch. I enjoyed the project, but the handling and communication of the different components needed some extra tinkering, which took me some time to figure out. I’ll try to sum up the build here. I can think of many use cases for a low power device which is controllable via SMS. For example for remote sensor data, or remote human interaction via SMS – one of the few protocols which is still present and accessable nearly everywhere in the world.
In this tutorial I’ll share my findings with the hardware and software, as well as power saving tips – that should make it easy for you to build your own setup. In my project it was especially important for me to keep the power consumption down to an absolute minimum so that the system can run on batteries for months. I achieved a current draw of around 7mAh in standby.
The main parts
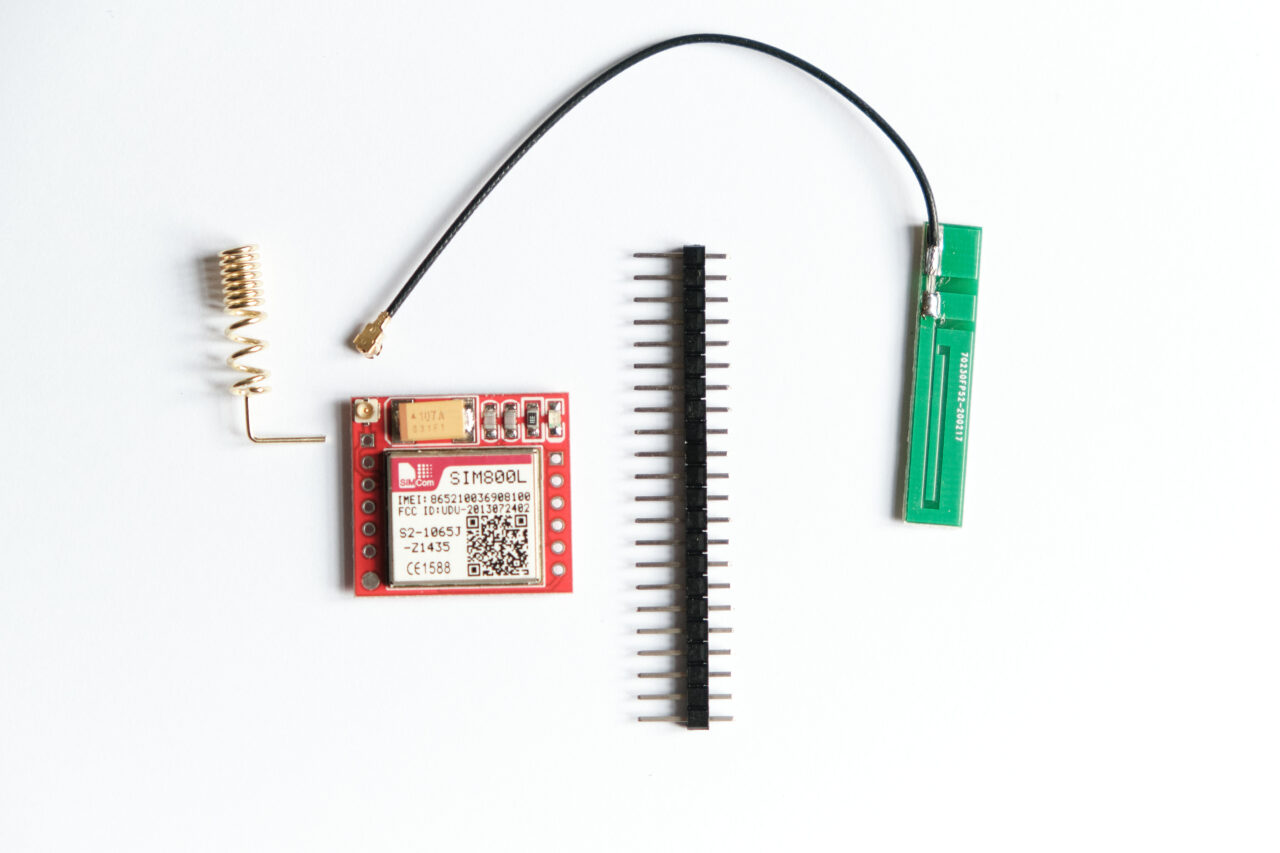
- SIM800L // 2G GSM Modem
2G quad-band @ 850/900/1800/1900 MHz
Receive and make calls using the speaker and microphone outputs
Receive and send SMS
Internet via GPRS
FM radio broadcasts
Standard AT Commands
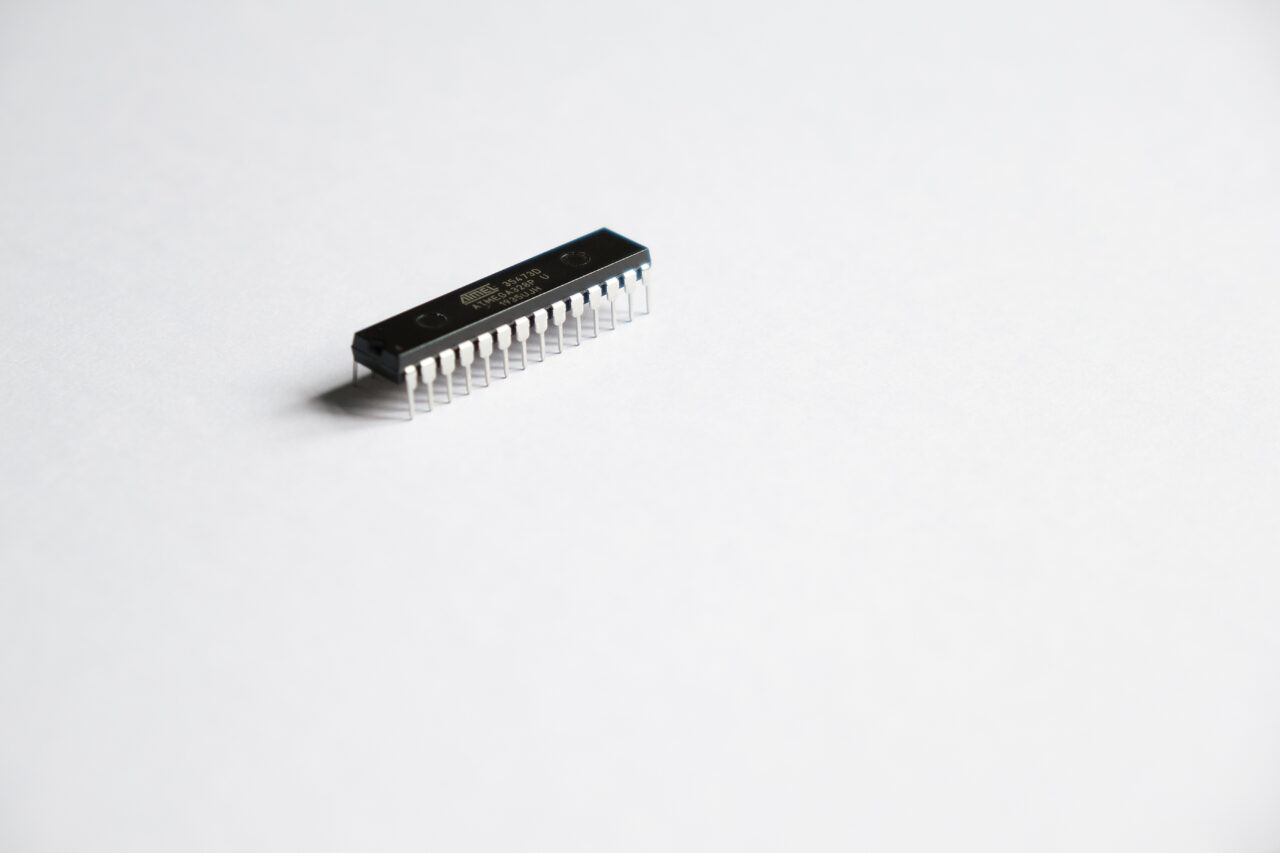
- ATmega328P
Microcontroller found in Arduino UNO
Well documented
Low Power functions
Hardware
Power
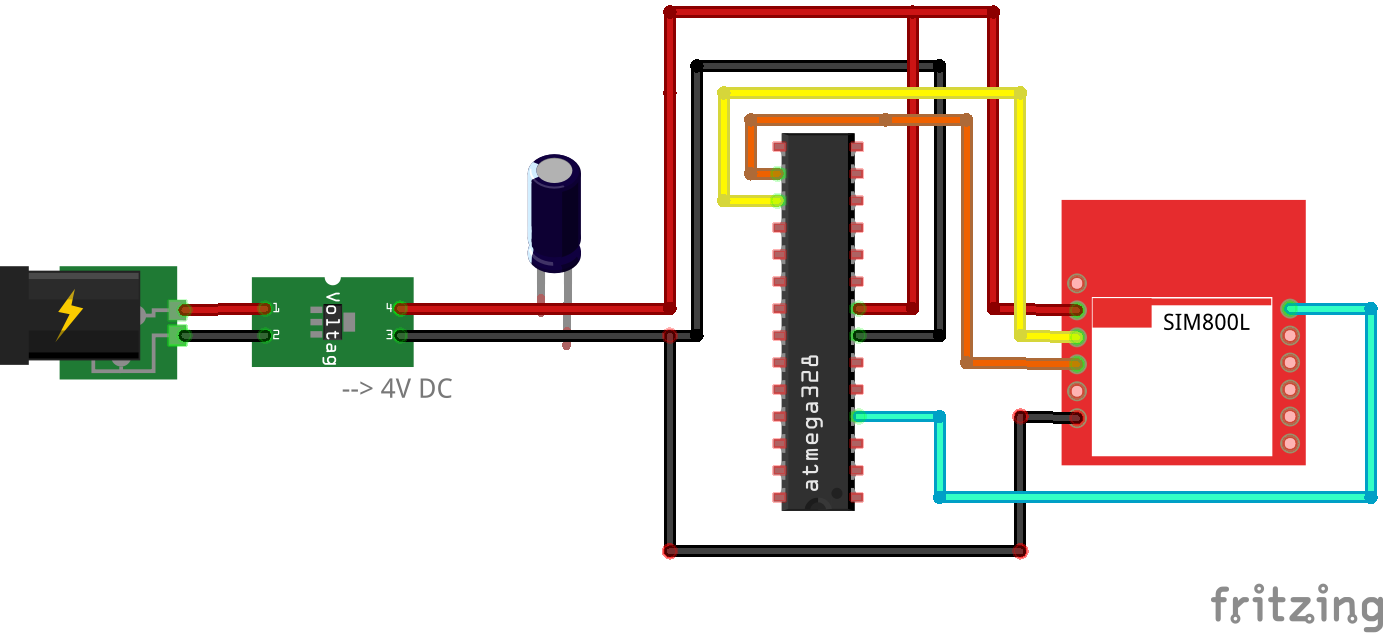
While the SIM800L GSM Modem runs on 3,7 to 4,2V, an Arduino normally runs at 5V which makes it incompatible with the module. It also won’t run with 3,3V microcontrollers. Luckily you can use the ATmega328P outside of an Arduino and step down it’s frequency from 16Mhz to 8Mhz. This not only makes it compatible to the SIM800L, it also saves a noticable amount of energy, because the ATmega328P uses less energy with it’s internal 8Mhz oscillator, as well as with lower voltage. Good for our power reduction goals!
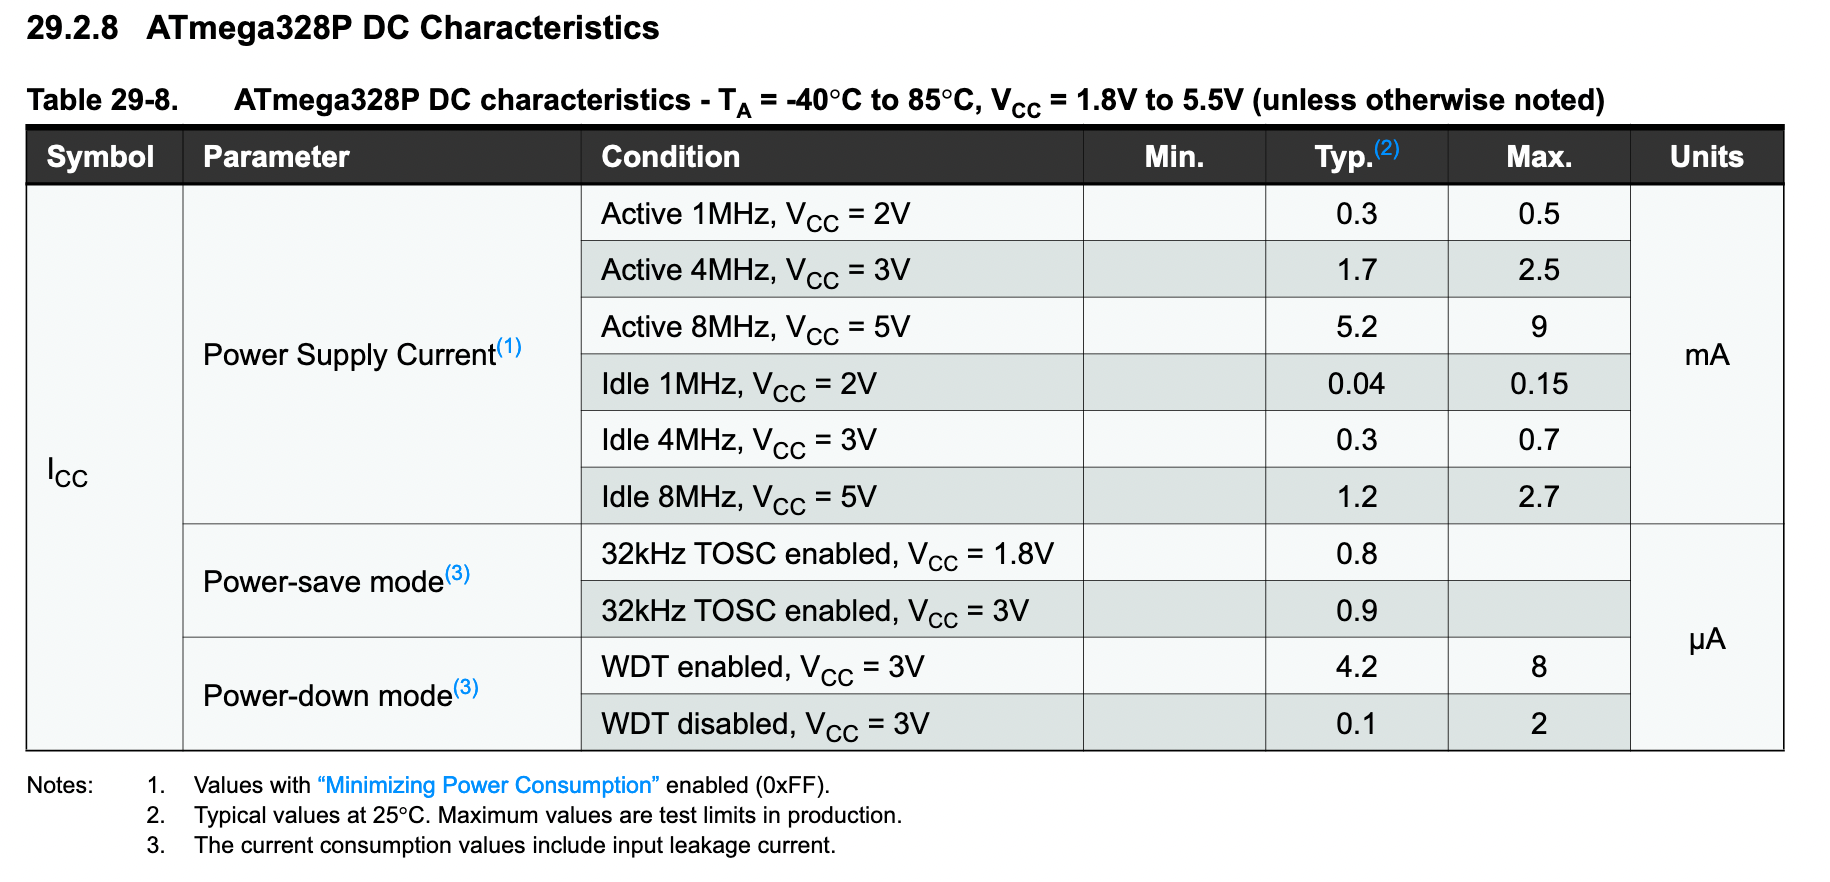
We see that the perfect operating voltage for all components is around 4V, as it fits the range of SIM800L as well as the ATmega328P. If we want to use batteries to power the system, this voltage is a bit tricky. The voltage of Li-Po or Li-Ion batteries are too low and change a lot depending on their charge. That’s not suitable for us because we don’t want to exceed 4,2V and also don’t won’t to go much beneath 4V as the GSM connection will become unstable.
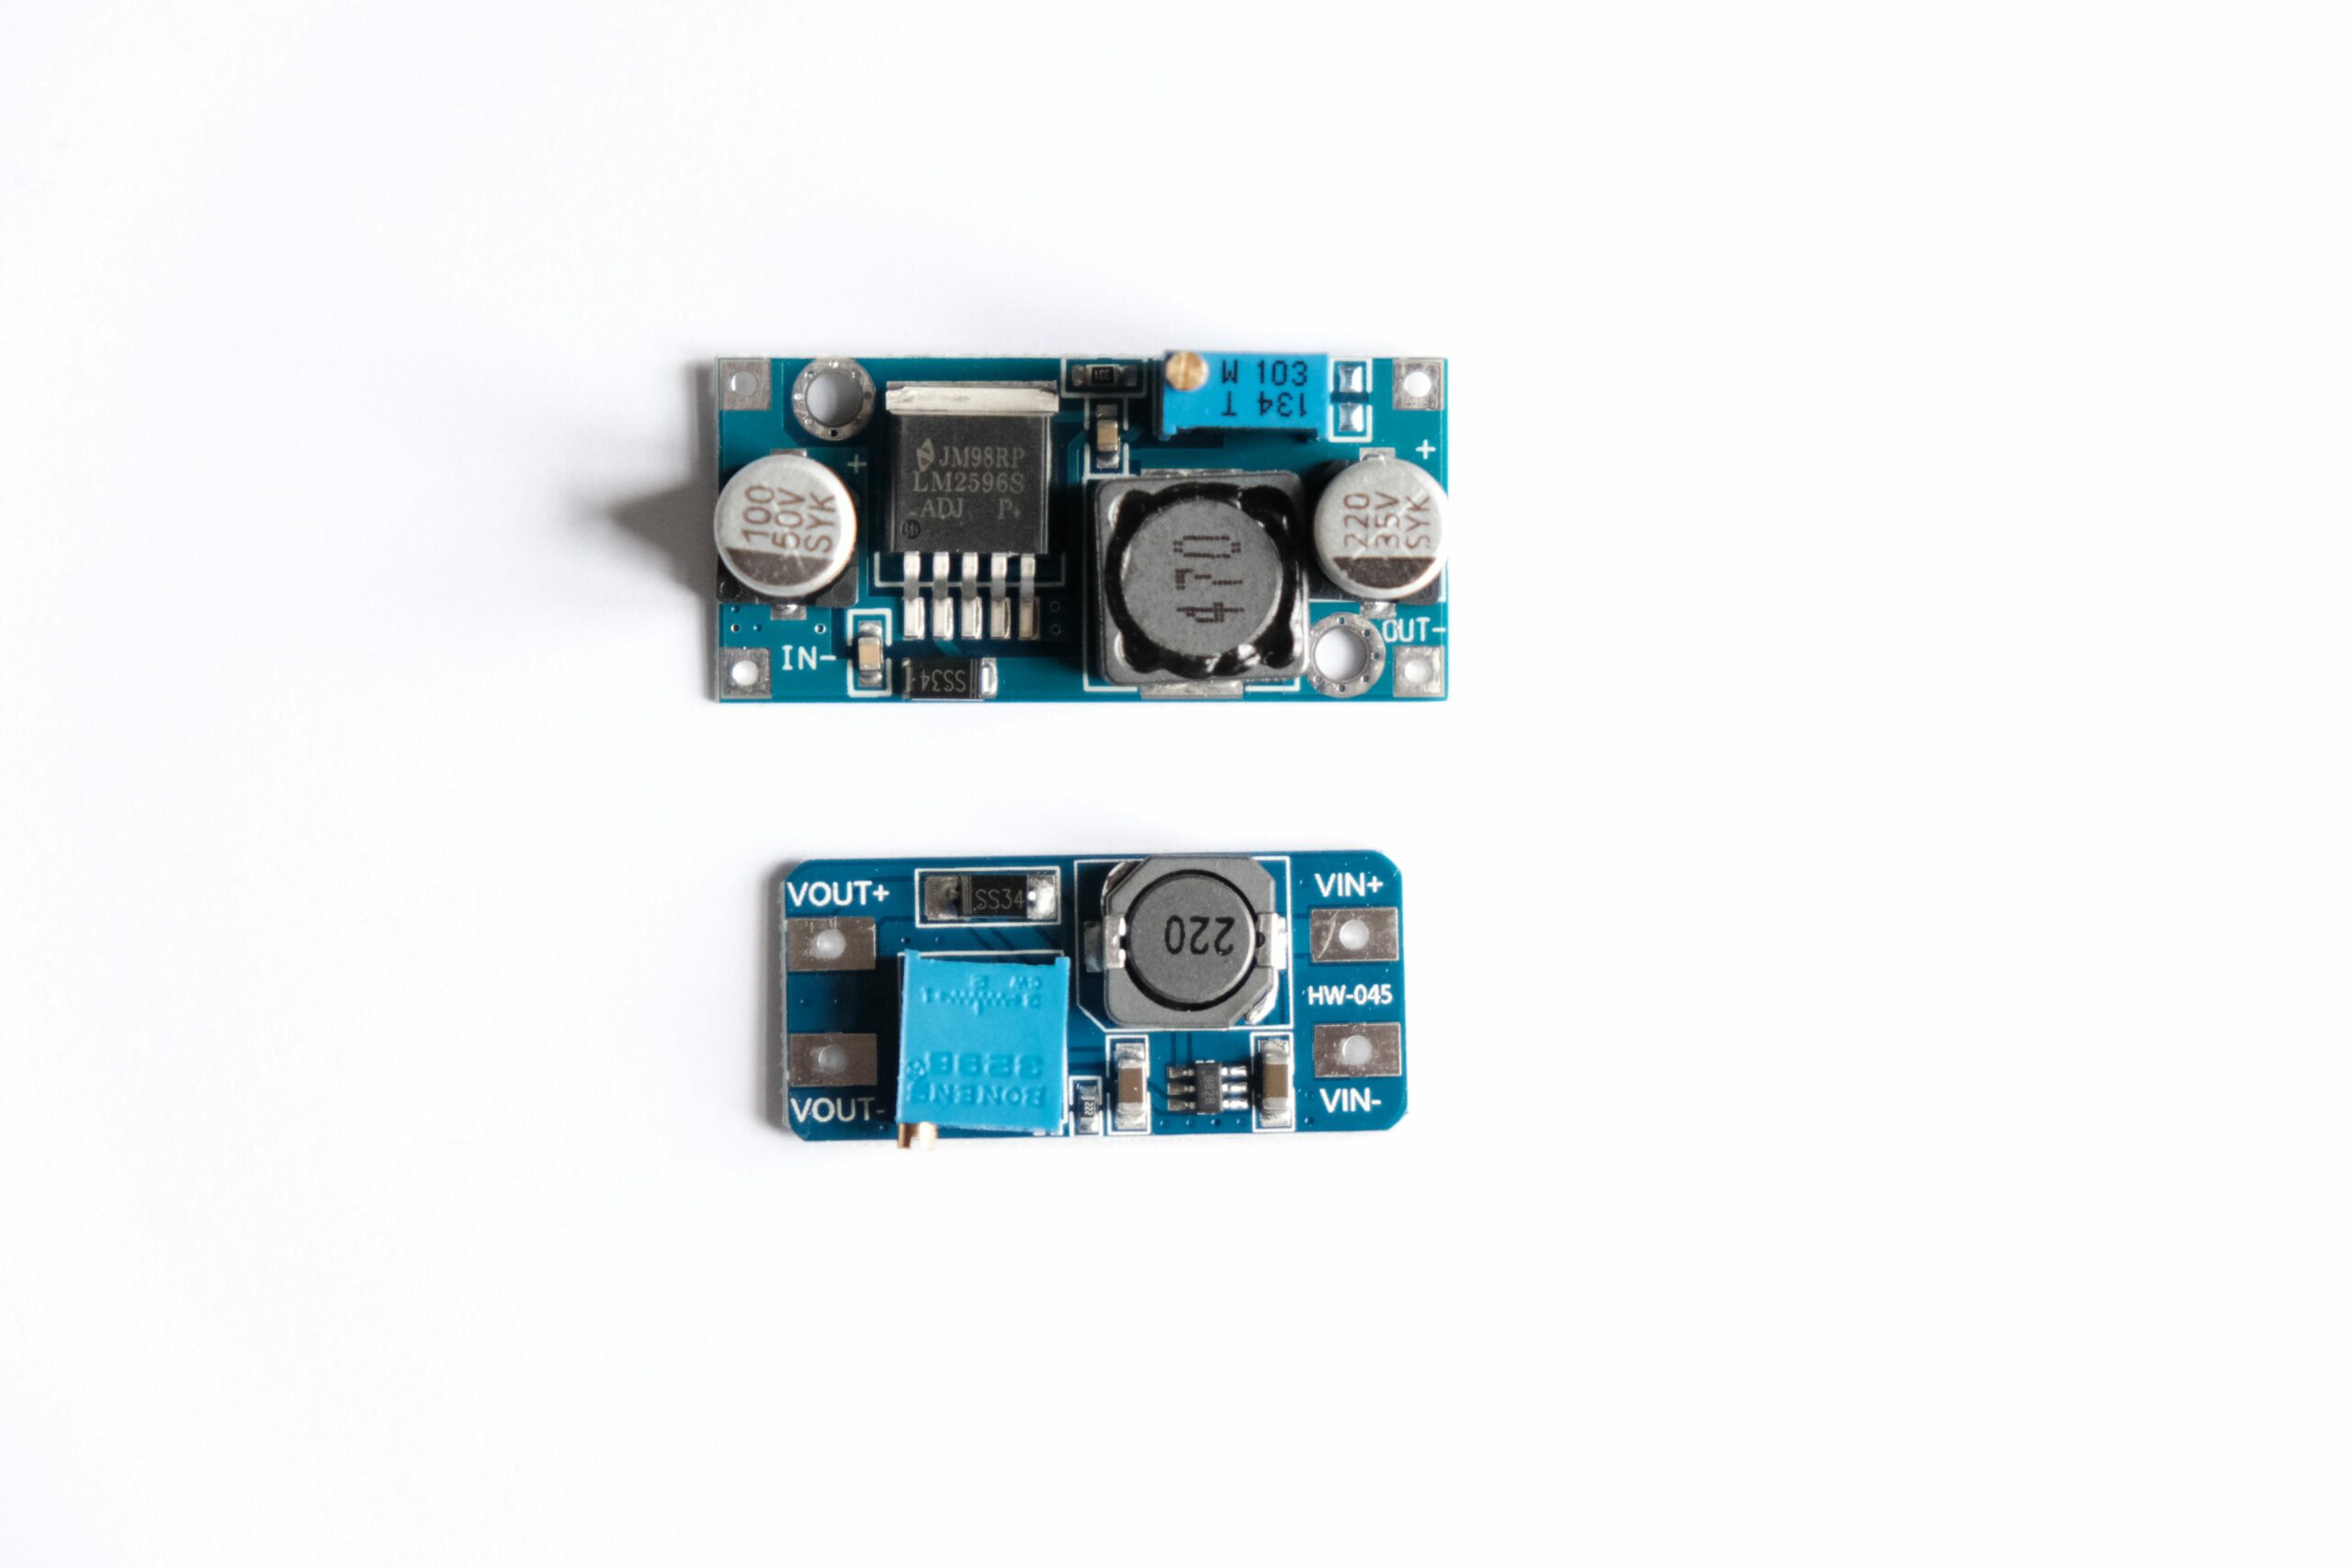
A solution is to use a LM2596S (or similar) regulator to step down a higher voltage or a MT3608 (or LM2577) to step-up the voltage to 4V (e.g. from 3V 2xAlkaline Cells which will go down to 2V when discharged). These converters work with approx. 93% efficency, which is not ideal but because it makes the setup so much cleaner than any other battery solution, I decided to make this compromise.
Power Spikes of SIM800L
The SIM800L is a great and very cheap module (only a few Euros) which is simple to use except of it’s power requirements. Though it doesn’t require a lot of current during standby operation it needs up to 2A with an input voltage of 3,7 to 4,2 V during connecting to the GSM network or while receiving/sending SMS. This is common on all GSM (or 3G and LTE) modems. But it makes it difficult to power without dropouts – the spikes by the power surges are short lived and very high.
Even when you have a sufficient power source, using thin or too long cables on a breadboard can result in the module not being able to boot up at all. What works best for me is using an awkwardly huge capacitor next to the module to jump in in case of higher power needs. I had sucess with using a 16V 2200μF capacitor in parallel to my power source. Everything below was unstable. I’m pretty sure there are better solutions for this – if you have recommondations, please drop a line!
Connecting SIM800L and ATmega328P
Connect the TX and RX Pins from the SIM800L to some Software Serial Pins on your ATmega328P. Additionally connect the RING Pin of the SIM800L to an empty pin on ATmega328P – this lets you use the microcontroller in deep sleep mode and listen to an interrupt to wake up on any signal from SIM800L. We’ll have a look at that later.
When everything is connected, you should see the LED on the GSM module blinking.
- Once a second – searching for a mobile network.
- Every three seconds – connected to a GSM network.
- Twice per second – connected to a GPRS network.
Software
SIM800L Library
Communicating with with SIM800L ist quite straight forward. I use the SIM800L Library, because it’s the only lightweight solution I could find. Other libraries are either bloated or don’t have SMS functionality. I recently discovered that there is a more recent fork of the library: Sim800L-Arduino-Library-revised. I didn’t test it, but the code looks a little bit cleaner and some functions are added. (You don’t have to code your GSM sleep function yourself, for example). But for the examples above, I’ll use the original one.
(In case you don’t like the library, have a look at the Adafruit Fona library a an alternative. It is made to work with the SIM800L and has a lot more functions implemented, including FM Radio and GPRS.)
After installing the library (I prefer to have them in my sketchfolder) you can use this little code snippet to test the connection between the components and see how the SIM800L reacts to your inputs:
#include <SoftwareSerial.h>
SoftwareSerial GSM(3,2);

void setup() {
  Serial.begin(9600);
  GSM.begin(9600);
}

void loop() {
  while (Serial.available()) {
      delay(1);
      GSM.write(Serial.read());
  }
  while (GSM.available()) {
       Serial.write(GSM.read());
  }
}
Now open your console and type “AT”. You should get “OK” as a response. There are a few AT commands available, which are documented at the Simcom AT command manual. For example the command “AT+CSQ” will output the current network signal quality.
Now let’s go one step further and use the library to stitch an AT command together to send a sms.
#include <Sim800l.h>
#include <SoftwareSerial.h>
Sim800l Sim800l;  //Declare the library

char* text;
char* number;

void setup(){
 Sim800l.begin(); // initializate the library.
 text="Hello World";  //text for the message.
 number="+123456789"; //change to a valid number.
 Sim800l.sendSms(number,text);
}


void loop(){
}
Setting Up Arduino Sleep Mode
This is how you can enable sleep mode on ATmega328P. With this code you set an interrupt Pin on Pin0 which will be triggered, when it’s state is LOW (the SIM800L sets it’s RING Pin to HIGH except when an SMS or Call is received). The microcontroller will wake as soon as the GSM Module will signal it and continous with the code in the interruptFuction().
#include <avr/sleep.h>

void sleepFunction() {
  sleep_enable();
  set_sleep_mode(SLEEP_MODE_PWR_DOWN);
  attachInterrupt(0, interruptFunction, LOW);
  sleep_cpu();
}

void interruptFunction() {
  sleep_disable();
  detachInterrupt(0);
}
Sleep Mode of SIM800L
If you use my fork of the SIM800L Library you’ll find some additional functions for the power saving mode. When activated, the module will automatically enter sleep mode after three seconds in which power consumption drops down to around 2mA. To exit sleep mode, there is simWakeUp(), which first sends a request for waking up the module and then disables the automatic sleep mode. The functions look like this:
void Sim800l::simSleep(){
   SIM.print (F("AT+CSCLK=2\r")); // sleepmode: enter sleep automatically
   delay(50);
   return;
 }
 void Sim800l::simWakeUp(){
   SIM.print (F("AT"));
   delay(100);
   SIM.print (F("AT+CSCLK=0\r"));
   delay(50);
   return;
 }
Stitching it all together in one script, it looks like this. There is some heavy debug console logging for you to know what’s going on.
- This script resets the ATmega328P after each complete cycle. This is because the extensive use of “String” data type in the SIM800L library which can cause memory fragmentation and as a result a buffer overflow. To avoid this, we simply reset after completion, but this is a ugly solution, just keep that in mind. It would be a better idea to avoid the use of “String” data type and work with pointers instead. This is a lot more work, though because we wouldn’t have those lovely String comparison functions which are so handy.
- From here on you can get creative and code your own behaviour and responses to messages.
#include <avr/sleep.h>
#include "Sim800l.h"
#include <SoftwareSerial.h>
Sim800l Sim800l;

void(* resetFunction)(void) = 0;

void sleepFunction() {
   sleep_enable();
   set_sleep_mode(SLEEP_MODE_PWR_DOWN);
   attachInterrupt(0, interruptFunction, LOW);
   sleep_cpu();
 }

void interruptFunction() {
   sleep_disable();
   detachInterrupt(0);
}

void SMS(){

   Sim800l.begin();
   Sim800l.simWakeUp(); //set SIM800L power saving mode off
   String textSms,numberSms;
   Serial.println(F("SIM Initializing..."));

   for(int i = 1; i<=2; i++){ // read the first 2 stored SMS

   textSms=Sim800l.readSms(i); //read the first sms

     if (textSms.indexOf("OK")!=-1) //is message not an error
         {
                 numberSms=Sim800l.getNumberSms(textSms);
                 textSms.toUpperCase();

                 Serial.println("Received from number: " + numberSms);
                 Serial.println("Received text: " + textSms);

                 if (textSms.indexOf(F("LED ON"))!=-1){
                     Sim800l.sendSms(numberSms,"LED turned on");
                     Serial.println(F("SMS SENT"));
                 }

                 else if (textSms.indexOf(F("LED OFF"))!=-1){
                     Sim800l.sendSms(numberSms,"LED turned off");
                     Serial.println(F("SMS SENT"));
                 }
         }
   }
   Sim800l.delAllSms();
   Serial.println(F("All SMS deleted"));
}

void setup(){
     Serial.begin(9600);
     Serial.println(F("Just (re)booted."));
 }

void loop(){
     SMS(); // checks for SMS ans answers them
     Serial.println(F("SIM done"));
     Sim800l.simSleep(); // sets SIM800L module to automatic sleep mode
     delay(100);
     sleepFunction(); // ATmega328P enters deep sleep mode, waiting for interrupt
     Serial.println(F("Just woke up. Resetting NOW."));
     delay(500);
     resetFunction(); //Reset the ATmega328P to avoid memory
     Serial.println(F("Should never see me."));
     }